
From The Art and Soul of Baking
Makes 8 dumplings
Fruit dumplings, related to turnovers, are often whole or halved fruit encased in pastry. The pit cavities of the fruit can be filled with dried fruit or sugar, but in this recipe the filling is soft, sweet almond paste blended with the same spices and molasses that make gingerbread so good. Though they look charmingly homespun, the flavor combination is sophisticated enough for a special dinner.
Equipment
Medium Bowl, Serrated Tomato Peeler or Very Sharp Vegetable Peeler, Small Spoon or Melon Baller, Small Bowl, Pastry Brush, Baking Sheet, Parchment Paper or a Silicone Mat, Chef’s Knife or Small Round Cutter, Cooling Rack
Ingredients
1 recipe Easy Cream Cheese Pie Dough, prepared for turnovers or dumplings (page 179)
7 ounces almond paste, at room temperature
2 tablespoons (1 ounce) mild, unsulfured molasses
1 ½ teaspoons ground ginger
½ teaspoon ground cinnamon
¼ teaspoon ground cloves
4 large (7 to 8 ounces each) firm-ripe peaches
1 egg yolk
1 tablespoon milk or cream
1 ½ tablespoons sugar
Vanilla Custard Sauce (page 424) or vanilla ice cream, for serving
Getting Ahead
The filling may be prepared up to 1 week in advance and stored, airtight, in the refrigerator. The dumplings may be assembled up to 4 hours in advance and stored in the refrigerator before baking.
1Preheat the oven to 375°F and position an oven rack in the lower third.
2 Make the filling: Crumble the almond paste into the medium bowl. Add the molasses, ginger, cinnamon, and cloves. Use your fingers to knead the spices and molasses into the almond paste. If the mixture is too sticky, run your hands under cold water, shake off the excess, and continue—the thin film of water on your hands will prevent the mixture from sticking to your fingers. Once the mixture is well blended, divide it into 8 equal pieces (about 1 ounce each) and roll into balls.
3 Fill the peach halves: Use the serrated tomato peeler to peel the peaches. Cut them in half, remove the pits, and use a small spoon or melon baller to remove the pit marks from the peach, enlarging the cavity slightly. Press a ball of almond paste into each cavity and flatten it level with the cut side of the peach. Spread the excess from the ball of almond paste along the cut surface of the peach. This thin film of almond paste will serve as a barrier to prevent the juices of the peach from soaking the pastry underneath.
4 Assemble the dumplings: Spread 8 of the dough squares out in front of you. Place a peach half, cut side down, in the center of each square. In a small bowl, beat the egg yolk with the milk to create an egg wash. For each dumpling, use a pastry brush to brush a thin film of egg wash along all four edges of the square. Bring the four corners of each square to the center, over the rounded portion of the peach, and pinch the seams together. (You may need to stretch the dough slightly if you have large peaches.) Line the baking sheet with parchment paper or a silicone mat and set the dumplings, evenly spaced, on the sheet. Brush each dumpling lightly with egg wash. Use a chef’s knife to cut the remaining square of dough into nine small squares, or use a small round cutter (about the size of a quarter) to cut eight small circles. Place one of the squares or circles at the top of each dumpling, hiding the point where the four corners come together. Brush these with egg wash. Sprinkle the dumplings with the sugar. Chill for 15 minutes.
5 Bake the dumplings: Bake for 15 minutes, then rotate the baking sheet front to back on the rack. Bake for 15 to 18 minutes longer, until the pastry is golden brown and the peaches are tender when pierced through the crust with the tip of a paring knife. Transfer to a rack and let cool slightly. Serve warm dumplings in shallow bowls, each set in a pool of custard sauce, or with a scoop of vanilla ice cream. Storing The dumplings are at their best the same day they are baked. They may be stored overnight in the refrigerator in an airtight container or covered with plastic wrap. Reheat before serving in a 375°F oven for 10 to 15 minutes, until warmed through.
Apple-Gingerbread Dumplings
Substitute firm, peeled baking apples, such as Granny Smith, for the peaches.
what the pros know
Almond paste is not the same as marzipan. Almond paste is a mixture of ground almonds, sugar, and almond extract designed to be used in combination with other ingredients in cakes or pastries. Marzipan, on the other hand, is a mixture of ground almonds, extract, and a significantly higher level of sugar (including liquid sugar to make it pliable), used mainly for candies and molded marzipan sweets that are eaten out of hand, not baked. Baking with marzipan will result in pastries that are darker (more sugar means more caramelization)
and much sweeter than intended.
Easy Cream Cheese Pie Dough
Makes enough dough for 9 turnovers or 8 dumplings, or 1 (9- or 10-inch) pie shell A nearly foolproof alternative to flaky dough, cream cheese dough can be made in the food processor in a couple of minutes. Rich cream cheese takes the place of water and helps to bring the dough together. The high proportion of fat means it’s practically impossible to toughen the pastry. The dough’s tangy flavor and flaky texture accent the fruit fillings in turnovers, though you could also use the dough for pies, either sweet or savory.
Ingredients
1 ½ cups (7 ½ ounces) unbleached all-purpose flour
1 teaspoon sugar (omit for savory pastry)
Pinch of salt
1 stick (4 ounces) cold unsalted butter, cut into ½-inch pieces
1 (8-ounce) package cold cream cheese, cut into 9 pieces
Equipment
Food Processor Fitted with a Metal Blade, Rolling Pin, Chef’s Knife, Ruler
1 Place the flour, sugar, and salt in the bowl of the food processor and process for 10 seconds to blend. Add the cold butter pieces and process for 8 to 10 seconds, until the mixture looks like bread crumbs. Add the cream cheese and pulse 30 times (1-second pulses), or until large, shaggy clumps of dough form.
2 Turn the shaggy mass out onto a work surface and knead gently 2 or 3 times to create a cohesive dough. If you are making turnovers or dumplings, flatten into a 7-inch square (about ¾ inch thick) and wrap in plastic. (For a pie, shape the dough into a ¾-inch thick round.) Chill for 30 minutes.
3 Place the dough on a lightly floured surface. If you are making turnovers or dumplings, roll into a square about ¹⁄8 inch thick (for rolling tips, see page 171). Use a chef’s knife to trim to a 15-inch square. Use the ruler to mark 5-inch increments along all sides of the dough. With the ruler as a guide, cut the dough into 9 (5-inch) squares. (For a pie, follow the instructions for rolling and shaping on page 171.)
Storing
Place rolled-out squares between sheets of parchment or wax paper on a baking sheet, wrap in plastic, and refrigerate for up to 2 days. You may also freeze them, layered between sheets of parchment, wrapped in plastic and sealed in a resealable plastic freezer bag or airtight container, for up to 2 months.
Getting Ahead
The dough can be prepared through Step 2 and refrigerated for up to 2 days or slipped inside a resealable plastic freezer bag and frozen for up to 2 months (thaw overnight in the refrigerator before rolling).
Monday, May 17, 2010
Peach-Gingerbread Dumplings


Wednesday, April 21, 2010
The Amazing Shape-Changing Bread
 From Baking Kids Love by Sur La Table and Cindy Mushet
Makes 1 delicious 9” x 5” loaf
Ingredients
for the bread dough
1 tablespoon active dry yeast (or 2 ¼ teaspoons instant yeast)
1 ¼ cups warm milk (no hotter than 115ºF)
2 teaspoons sugar
3 ¼ cups unbleached allpurpose flour
1 ½ teaspoons salt
4 tablespoons unsalted butter, melted
To finish
1 large egg yolk
1 teaspoon water
Tools
Small bowl
Whisk
Large bowl
Wooden spoon
Bench scraper
9 by 5-inch loaf pan, lightly buttered or sprayed with pan spray
Pastry brush
1. Proof the yeast
• Wake up the yeast by whisking it into ¼ cup warm (not hot) milk in a small bowl. Stir in the sugar and set the bowl aside for 8 to 10 minutes, until it looks foamy (see page 9).
• If the yeast isn’t foamy after 15 minutes (it didn’t wake up), start over with a new package.
2. Mix the dough
• Put the flour and salt in the large bowl and whisk to blend. Make a well in the center and add the yeast mixture. Pour in the remaining 1 cup of warm milk and the melted butter. Stir well with the wooden spoon until you get big, shaggy clumps of dough and it all starts to stick together.
3. Knead the dough
• Sprinkle a little flour on your work surface (don’t put too much, because you can always add more later). Dip your hands in flour and start kneading the dough (see page 12). It will take about 10 minutes of kneading until you get a smooth, springy dough.
• Sprinkle a little more flour on the table and on top if the dough feels very sticky. It should feel tacky, like tape, but not sticky and gooey. A metal bench scraper is handy to scrape up any bits of dough that are stuck to the table, and to help you move the dough around.
4. Let the dough rise
• Wash out the large bowl and rub the inside with a thin layer of vegetable oil (or use pan spray). Shape the dough into a ball and put it in the bowl. Lightly rub or spray the top of the dough with a little oil. Cover the bowl with plastic wrap. Set it aside and let the dough rise until it is twice as big, 45 minutes to 1 hour.
5. Punch down and shape the dough
• Gently turn the dough out onto a lightly floured table. Press down firmly to flatten the dough and pop the air bubbles in the dough. Don’t knead or it will get too springy to shape.
• To shape the dough into a loaf, gently pull the flattened dough into a 7 by 10-inch rectangle.
Wednesday, April 14, 2010
Fontina Fondue with Grappa and Chopped Broccoli
 From Things Cooks Love: Implements. Ingredients. Recipes.
By Sur La Table and Marie Simmons
Fondue Pot recipe
Prep 30 min | Cook time (bread) 20 min | Cook time (fondue) 10 min | Serves 4–6
The classic fondue is made with Gruyère and Emmental cheese melted with white wine and a splash of kirsch, a clear brandy distilled from cherry juice and pits. This riff on that tradition is made with imported Italian fontina Val d’Aosta, a rich, nutty cheese used to make fonduta, the famed fondue of northern Italy that combines cheese, egg yolks, and cream. The broccoli is a pretty touch but is optional, as is the crushed red pepper.
Implements
Tongs, Rimmed Sheet Pan, 2- or 3-Quart Saucepan, Strainer, Fondue Pot, Slotted
Spoon
Ingredients
1 loaf whole wheat Italian or French bread, cut into 1-inch cubes
¼ cup extra-virgin olive oil, plus more as needed
1 cup coarsely chopped (¼-inch pieces) broccoli florets, (optional)
½ teaspoon coarse salt
1 large clove garlic, halved lengthwise
1 cup pinot grigio or other dry white wine
1 tablespoon grappa or brandy
1 pound fontina Val d’Aosta cheese, rind removed and coarsely shredded (about 8 cups)
3 tablespoons all-purpose flour
Pinch of crushed red pepper (optional)
1. Preheat the oven to 350°F. Place the bread cubes in a large bowl and drizzle with the oil. Use tongs or your hands to toss the bread, coating it with the oil and adding a little more oil if the cubes aren’t evenly coated. Spread the bread on a large rimmed sheet pan and bake for 20 minutes, or until very lightly toasted. Remove from the oven and let cool.
2. Heat to a boil a 2- or 3-quart saucepan half filled with water. Add the broccoli and salt and boil for 3 minutes, or until tender. Drain in a strainer and rinse with cold water. Set aside.
3. Rub the inside of a flameproof ceramic fondue pot with the cut sides of the garlic. Discard the garlic, or reserve for another use. Add the wine to the fondue pot and bring to a simmer over medium heat. (Check the manufacturer’s instructions to see if a heat diffuser is necessary.) Add the grappa.
4. In a large bowl, combine the cheese and flour and toss to combine. Gradually add the cheese, a handful at a time, to the simmering wine, stirring vigorously with a slotted metal or wooden spoon after each addition until melted before adding more cheese. Fold the broccoli and red pepper into the melted cheese until blended.
5. Put the bread cubes on a platter or in a basket and place on the table. Place the tabletop heater in the center of the table and place the fondue pot on top. Provide each diner with a fondue fork for spearing the bread cubes and dipping into the communal pot.
Wednesday, March 31, 2010
Pavlovas with Honey-Lavender Cream and Poached Strawberries
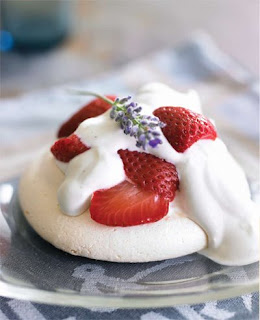 From The Art and Soul of Baking
Makes 8 Pavlovas
Pavlova, the favorite dessert of Australia and New Zealand, consists of a meringue shell that is crispy on the outside and soft on the inside, cradling a filling of whipped cream and fruit. It was named in honor of the Russian ballerina Anna Pavlova, famous at the time for her beautiful dancing. Apparently the dessert was as light and lovely as Anna herself, who toured New Zealand in the late 1920s and Australia in the mid 1930s. This version features poached strawberries and whipped cream sweetened with lavender sugar, an easy-to-make combination of granulated sugar and dried lavender ground to a fine powder. You might wonder why anyone would bother to poach strawberries, since they are so delicate in their fresh state. The heat from the poaching syrup softens their flesh, making them meltingly tender so they practically dissolve in your mouth. The poached berries meld beautifully into the soft cream and marshmallow-like meringue in this very special dessert.
Ingredients
Meringue
2/3 cup (4 3/4 ounces) sugar
1 tablespoon cornstarch
3 large egg whites
¼ teaspoon cream of tartar
Pinch of salt
¼ teaspoon pure vanilla extract
Strawberries
3 pint baskets (about 3 pounds) fresh strawberries
2 cups (16 ounces) water
1 ¼ cups (8 ¾ ounces) sugar
Honey-Lavender Cream
2 tablespoons (1 ounce) sugar
1 tablespoon dried lavender blossoms or
2 tablespoons fresh lavender blossoms
1 ½ cups (12 ounces) heavy whipping cream
1 ½ tablespoons mild-flavored honey, such as orange blossom
Fresh lavender, for garnish
Equipment
Fine-Mesh Strainer, Small Bowl, Stand Mixer Fitted with a Whisk Attachment or a Hand Mixer and a Medium Bowl, Silicone or Rubber Spatula, 12 by 17-inch Baking Sheet, Parchment Paper or Silicone Mat, ¹⁄³-cup Dry Measuring Cup, Cooling Rack, Strawberry Huller or Paring Knife, Medium Saucepan, Spice or Coffee Grinder, Slotted Spoon
1 Make the meringues: Preheat the oven to 250°F and position an oven rack in the center. Use the fine-mesh strainer to sift 2 tablespoons of the sugar and all the cornstarch into the small bowl. Place the egg whites, cream of tartar, and salt in the bowl of the stand mixer and whip on medium-high speed for 1½ to 2 minutes, until soft peaks form. You can also use a hand mixer and a medium bowl, although you may need to beat the mixture a little longer at each step to achieve the same results. Add the vanilla and, with the mixer running, slowly rain in the remaining sugar. Turn the speed to high and whip until the meringue is very stiff, 30 to 45 seconds. Sift the sugar-cornstarch mixture over the meringue and gently fold it in with the spatula just until blended.
2 Line the baking sheet with parchment paper or a silicone mat. Gently spoon meringue into the ¹⁄³-cup measuring cup, level the top, and use the spoon to help turn it out onto the baking sheet. Create 7 more portions in this manner, spacing them evenly. Use the back of the spoon to make a well in each meringue. The finished meringues should be about 3 inches wide and 1 inch tall.
3 Bake the meringues for 50 to 55 minutes, until faintly golden and crispy on the outside. The interior will still be soft and fluffy. Transfer to a rack and cool completely.
4 Poach the strawberries: Wash the berries and pat dry. Hull each berry using a strawberry huller or the tip of a paring knife. If the strawberries are large, cut them into quarters or ¼-inch thick slices. Place the water and sugar in the medium saucepan and bring to a boil. Simmer for 1 to 2 minutes, until the sugar is completely dissolved. Carefully transfer the berries to the syrup and bring back to a simmer. As soon as the syrup begins to boil again, remove from the heat and cover the pot. Let the berries sit in the syrup until the mixture is room temperature, about 30 minutes—they will poach in the residual heat.
5 Make the honey-lavender cream: Place the sugar and lavender in the spice or coffee grinder and grind until the texture is very fine. Transfer to the small bowl. Place the cream, honey, and 1 ½ tablespoons of the lavender sugar in the cleaned bowl of the stand mixer and whip until the cream holds soft peaks (save the remaining lavender sugar for another use). You may also use the cleaned hand mixer and medium bowl here. Cover with plastic wrap and refrigerate for 30 minutes to allow the flavors to blend.
6 Assemble the Pavlovas: Use the slotted spoon to scoop the strawberries from the poaching liquid and drain slightly on paper towels. (Save the poaching syrup for flavoring sparkling water or use it for a refreshing twist in your favorite cocktail.) Place a meringue on each serving plate. Fill the center of each meringue with honey lavender cream and top with 4 or 5 strawberries. Garnish with some fresh lavender and serve immediately.
What the Pros Know
Be sure you purchase dried lavender from a culinary source such as the bulk department of a health food store or a specialty herb supplier, so you can be sure the flowers were not treated with harmful chemicals. Flowers grown for commercial and potpourri use are laden with pesticides and should never be used in cooking or baking.
Getting Ahead
The meringues can be baked up to 3 days in advance and stored in an airtight container at room temperature. The strawberries can be poached up to 2 days in advance and refrigerated in the poaching syrup. The lavender sugar can be prepared up to 1 month in advance and stored airtight at room temperature. The honey-lavender cream can be prepared up to 3 hours in advance and chilled in an airtight container.
Thursday, March 25, 2010
Panko-Crusted Chicken Cutlets with Arugula Salad
 From Things Cooks Love: Implements. Ingredients. Recipes.
Prep 25 min | cook time 10 min | serves 4
Panko, sold in Asian groceries and in many supermarkets, develops a golden, crunchy crust when fried that stays crisp. Here, the panko are tossed with grated Parmigiano Reggiano cheese to give them an Italian profile and extra flavor.
Implements
Paring or Utility Knife, Meat Pounder, Spiral or Small Whisk, Medium Shallow Bowl, Shallow Baking Dish, Large Rectangular Wire Rack, Rimmed Sheet Pan, 10- to 12-inch Skillet, Tongs, Medium Bowl
Ingredients
4 (4- to 5-ounce) boneless, skinless chicken breast halves
Coarse salt
Freshly ground black pepper
4 paper-thin slices prosciutto
1 large egg
¼ cup milk
1 ¼ cups panko
¹⁄3 cup grated Parmigiano-Reggiano
Canola or other flavorless vegetable oil, for frying
Arugula Salad
1 tablespoon red wine vinegar
½ clove garlic, grated or minced
½ teaspoon coarse salt
2 tablespoons extra-virgin olive oil
2 tomatoes, cut into thin wedges
2 cups packed arugula or baby spinach leaves, rinsed and dried
1. Trim any bits of tendon or fat from the chicken. Make sure the fillet, or tenderloin, attached to the underside of each breast has been removed. If it hasn’t, gently pull it away from the breast and reserve for another recipe.
2. Cut 2 sheets of plastic wrap each about 10 inches long. Place a chicken breast on 1 sheet and cover with the second sheet. Gently pound the chicken until evenly flattened to between ¼ and ¹⁄3 inch thick. Repeat with the remaining breasts. When all of the breasts have been pounded into cutlets, sprinkle them lightly on both sides with salt and pepper. Pat a slice of prosciutto on top of each cutlet and trim any excess.
3. Whisk the egg in a shallow bowl and then whisk in the milk. Combine the panko and grated cheese in a shallow baking dish and stir to mix. Dip the chicken in the egg and let the excess drip back into the bowl. Lay the chicken on the panko mixture, turn to coat, and press the crumbs into the chicken with your fingertips.
4. Place a rectangular wire rack on a rimmed sheet pan. Heat a heavy 10- to 12-inch skillet over medium-low heat. Pour in vegetable oil to a depth of about ½ inch and heat until hot. To test the heat of the oil, add a pinch of panko. It should sizzle and turn golden brown on contact. When the oil is ready, add the chicken 1 or 2 pieces at a time, depending on the size of the skillet. Cook, turning once, for 2 minutes per side, or until the panko turns a deep gold. Use tongs to lift the chicken from the oil and place on the wire rack.
5. meanwhile, make the salad: In a medium bowl, whisk together the vinegar, garlic, and salt. Slowly whisk in the olive oil in a slow, steady stream. Add the tomatoes and arugula and toss to coat evenly.
6. Place a chicken cutlet in the center of each dinner plate. Distribute the salad evenly on top of the cutlets. Serve at once.
Monday, March 15, 2010
White Chocolate–Lime Crème Caramel
 From The Art and Soul of Baking
Serves 6
Whether you call it flan, crème caramel, or crème renversée, it’s hard to resist a creamy custard turned upside down and served in a pool of liquid caramel. The flavors of crème caramel are always more complex than regular custard because of the caramel that surrounds it during baking and chilling, which adds a layer of flavor beyond the custard itself. A measure of white chocolate gives this one a lovely texture, while the lime and caramel work in tandem to cut the sweetness of the chocolate. Though this is a classic crème caramel, with whole milk and eggs only, the white chocolate makes it taste richer and creamier.
Ingredients
Custard
2 cups (16 ounces) whole milk
3 tablespoons (1 ½ ounces) sugar
Grated zest of 3 limes
3 large eggs
6 ounces white chocolate, finely chopped
Caramel Lining
½ cup (4 ounces) water
1 cup (7 ounces) sugar
¼ teaspoon cream of tartar
Candied lime zest (page 352) and Softly
Whipped Cream (page 416), for serving
Equipment
Medium Saucepan, Small Saucepan, Six (6-Ounce) Ceramic Ramekins or Custard Cups, Small Bowl (Optional), Large Roasting or Baking Pan, Whisk, Medium Bowl, Fine-Mesh Strainer, Pitcher or Large Measuring Cup with Spout, Tongs, Cooling Rack, Mini-Spatula
1 Make and flavor the custard: Heat the milk, sugar, and lime zest in the medium saucepan over low heat just until the mixture begins to simmer. Remove from the heat, cover, and allow to steep for 1 to 1½ hours, until the lime flavor is strong. You can even leave the mixture to steep overnight in the refrigerator, if you like.
2 Make the caramel lining: Pour the water into the small saucepan and add the sugar and cream of tartar. Cook over medium heat, stirring constantly, until the sugar has dissolved and the liquid is clear. Increase the heat to high and boil rapidly, swirling the pan occasionally (without stirring) to cook the sugar evenly, until the caramel turns a deep golden brown (for more on caramelizing sugar, see page 26). Remove from the heat and immediately divide the caramel among the custard cups, swirling each cup to distribute the still-liquid caramel evenly up the sides. Be careful to go only about halfway up the sides. The caramel is very hot and you don’t want it to drip off the edge of a cup and onto your skin. You may want to keep a small bowl of ice water nearby in case a bit of caramel touches your skin. Set the caramel-lined cups in the roasting pan, making sure they don’t touch, and let them cool for 10 minutes.
3 Preheat the oven to 325°F and position an oven rack in the center.
4 Temper the eggs: Place the saucepan with the lime-infused milk mixture back over medium heat, uncover, and reheat just until it begins to simmer. Whisk the eggs in the medium bowl. Twist a damp kitchen towel into a rope and wrap it around the bottom of the bowl to secure it while you temper the eggs. Pour about ½ cup of the hot milk mixture into the eggs, whisking constantly. Once blended, whisk in another ½ cup. Then slowly pour the rest of the mixture into the eggs, whisking constantly. Add the white chocolate and whisk until melted and blended completely.
5 Strain and bake the custard: Pour the mixture through the strainer into the pitcher and discard the zest. Divide the warm custard among the cups in the pan. Pull out the oven rack and place the pan on the rack. Remove one of the cups, pour enough hot tap water (not boiling) into that area to come halfway up the sides of the cups, and replace the cup. Cut a piece of foil large enough to fit just inside the edges of the roasting pan, then lay the foil across the top of the cups, making sure it doesn’t touch the custard. You may need to smooth and flatten the foil on the counter if any wrinkles touch the custard. Gently push the rack back into the oven, shut the oven door, and bake the custards for 30 to 40 minutes, until they are just set and their centers are no longer wobbly (test by gently tapping the side of the pan with a spoon).
6 Remove the foil and then the pan from the oven, being careful not to tilt the pan and splash water on top of the custards. Set the pan on a heatproof surface. Use a pair of tongs (or your hand protected by a kitchen towel) to immediately remove the cups from the water bath and place them on a rack to cool to room temperature, about 40 minutes. Cover with plastic wrap and refrigerate until cold, at least 4 hours or overnight.
7 Unmold the custards: Run a mini-spatula or a thin, flexible knife inside the edge of a cup, pressing the knife into the cup to avoid gouging the custard. Place a serving plate upside down on top of the cup, then, holding the two together, invert them. The custard should slide out of the cup and onto the plate. Candied lime zest is a lovely garnish here. Place a few strands on top of each custard and scatter a few more around each plate.
8 Serve the custards: Crème caramel is at its best at room temperature, so let the custards, still in their cups, sit out for about 30 minutes before serving. If you like, place a small spoonful of softly whipped cream on top of each. Candied lime zest is a lovely garnish here. Place a few strands on top of each custard and scatter a few more around each plate. To make candied citrus zest: Zest 4 limes, lemons, oranges, tangerines, or grapefruits using a vegetable peeler. Scrape off any white pith with the tip of a knife and cut the zest into long thin strips. In a small saucepan, bring 1 cup of water and 1 cup of sugar to a boil. Stir briefly until the sugar has dissolved and the liquid is clear. Add 2 tablespoons of light corn syrup and the zest. Reduce the liquid to a simmer, cover, and cook for 20 to 30 minutes, or until the zest is translucent and tender. Use immediately or refrigerate the candied zest in the syrup in an airtight container for up to 1 month.
White Chocolate–Lemon Crème Caramel Substitute the zest of 2 lemons for the lime zest.
White Chocolate–Orange Crème Caramel Substitute the zest of 1 large orange for the lime zest.
Getting Ahead
The caramel-lined cups can be prepared a day in advance and kept at room temperature, covered with plastic wrap. The custards can be baked up to 2 days in advance and chilled, covered with plastic wrap. Unmold shortly before serving.
what the pros know
Caramel is nearly impossible to scrub out of pans and dishes. The easiest solution for removing it from the saucepan is to fill the pan with water, bring it to a boil for 5 minutes (dissolving the caramel), and then discard the water. To clean custard cups, place them in a large pot, fill with water, and simmer for 10 minutes to dissolve the caramel. (If the caramel is particularly stubborn, you may need to do this twice.)
Tuesday, March 2, 2010
Spicy Steamed Mussels with Fennel and Tomatoes
 From Knives Cooks Love, by Sur La Table and Sarah Jay
This punchy rendition of mussels in white wine offers a quick course on several cuts: slicing, dicing, mincing, and chiffonading. Serve the mussels with crusty bread for dipping into the peppery tomato broth, or ladle the mussels and broth over hot linguine. When buying mussels, ask the fishmonger for a bag from the refrigerator in back, which are often fresher than those in the front display.
Serves 2 to 3 as a main course
1 small fennel bulb
1 small yellow onion
1 carrot
3 cloves garlic
2 small tomatoes
10 to 12 large fresh basil leaves
1 teaspoon black peppercorns
1/2 teaspoon fennel seeds
1/2 teaspoon kosher salt
1/8 teaspoon red pepper flakes
3 tablespoons extra-virgin olive oil
3/4 cup dry white wine
2 pounds mussels, scrubbed and debearded (discard any that do not close)
Trim the stalks from the fennel and cut a thin slice off the bottom; then core and cut the fennel into 1/4-inch crosswise slices (see page 119). Put the fennel into a large bowl. Cut the onion crosswise into ¼-inch semicircles (see page 95) and add to the bowl. Peel the carrot and cut into 1/4-inch dice (see page 109) and add to the bowl. Peel and mince the garlic (see page 100) and add to the bowl.
Core the tomatoes. Cut them in half through the equator and squeeze out the seeds. Cut them into ¼-inch dice (see page 127) and put them in a separate bowl. Cut the basil into chiffonade (see page 133) and reserve for the garnish.
Lightly crush the peppercorns and fennel seeds in a mortar and pestle. (Alternatively, put them in a small self-sealing plastic bag. Using the bottom of a cast-iron skillet, lightly crush them. Transfer the spices to a small dish.) Add the salt and red pepper flakes. Set aside.
Heat the oil in a heavy 6-quart or larger stockpot over medium heat. Add the fennel, onion, carrot, and garlic, and sauté, stirring occasionally, until softened but not browned, about 5 minutes. Stir in the spice mixture. Add the wine and the tomatoes along with any juices in the bowl. Bring to a boil.
Add the mussels to the stockpot (don’t stir), cover, and steam until the mussels open, about 5 minutes. Scoop the mussels into individual shallow bowls, discarding any that remain closed, and then spoon some vegetables and broth over them. Sprinkle each bowl with basil and serve immediately.
Fennel
Trimming, Coring, Slicing, and Dicing
If you’re braising or roasting fennel wedges, leave the core intact so it holds the fennel together. But for slicing or dicing, do cut away the core first. Lengthwise slices emphasize the vegetable’s tough and fibrous quality. Crosswise slices are more tender and juicy, and better for salads.
1 Cut off the stalks close to the bulb (save the fernlike fronds for a garnish, if you want). Trim off the hard base. If the outer layer isn’t too blemished or fibrous, leave it on. Otherwise, remove it and discard (or save for stock).
2 Cut the bulb into lengthwise quarters. Stand up one quarter on its base, or let it rest on the rounded side, and cut away the core. Repeat with the other three pieces.
3 Set the pieces on a flat side. Cut crosswise or lengthwise slices of the width you need. (For a dice, cut lengthwise slices and gather a few strips and cut across them.)