
 From Things Cooks Love: Implements. Ingredients. Recipes.
Almost every American cook has had some exposure to French cooking, and that made the selection of cookware, tools, and recipes for this chapter an exciting challenge. The French have had an amazing impact on what Americans eat and how we talk about cooking. You can hardly look at a cooking magazine, read a restaurant menu, or step into a fast-food joint without seeing the words soufflé, fondue, crème brûlée, pâté, quiche, and, of course, French fry. Discover specialized cookware such as the cocotte, the chinois, the raclette grill, the mussel pot, and the pommes Anna pan, and rediscover familiar pieces like the crepe pan, the omelet pan, and the fondue pot. Then you can serve up these Gallic specialties using the wonderful variety of cheeses, oils, vinegars, and other specialties of France.
Cheese
Brie
This rich cow’s milk cheese has a creamy, soft interior and is covered by a chalky, mildly flavored edible rind. Brie imitations are sold everywhere but, for a special meal, seek out an imported Brie de Meaux. (This is almost impossible to find in the United States because it is made from raw milk and aged less than the FDA-required sixty days. An excellent substitute is an imported knockoff called Fromage de Meaux that is almost as good as the real thing.)
Chèvre
The word chèvre means “goat,” and is also used to describe a pure goat’s milk cheese in France. Goat cheeses are made throughout the world, but the French probably have the widest range of types, shapes, and sizes. Typically, the cheeses have a tangy, almost lemony taste. Soft fresh goat cheeses are often melted into sauces or cut into disks, browned, and served as the enterpiece of a salad. The semiaged log-shaped Bucheron has a tangier, more complex flavor than a fresh chèvre, and a drier, chalkier texture that makes it ideal for crumbling on top of salads.
Comté
A cow’s milk cheese from the Jura in eastern France, near the Swiss border. It has a sweet, nutty taste and, although it is a firm cheese, it has a soft feel in your mouth. Sometimes compared to Gruyère, it is both a great melting cheese and eating cheese.
Check out Things Cooks Love for more on The Frech Pantry....
Friday, September 11, 2009
The French Pantry

Tuesday, September 8, 2009
Corn Tortillas Casserole
 From Things Cooks Love: Implements. Ingredients. Recipes.
Prep time 30 min | cook time (sauce and chiles) 20 min | cook time (casserole) 35 min | serves 6
Known as a sopa seca, or "dry soup," this casserole is the definition of Mexican comfort food. Corn tortillas cut into strips are layered with spicy tomato sauce, roasted poblano chiles, and two types of cheese, one soft and melting and the other dry and sharp. The top is spiced with sour cream or Mexican crema, a rich, thick cream available in Mexican grocers, and then the whole thing is baked.
Implements
Large Sauté Pan, Stove-top Pepper Roaster, Tongs, Heavy 10-inch Skillet, Slotted Spoon, Round or Rectangular Terra-cotta Baking Dish
Ingredients
Tomato Sauce with Chipotle Chiles
2 tablespoons flavorless vegetable oil
¼ cup chopped white onion
1 clove garlic, chopped
3 cups canned tomato puree
1 canned chipotle chile in adobo sauce, finely chopped, plus 1 teaspoon adobo sauce
½ teaspoon coarse salt
1 poblano chile
Canola oil, for frying
12 to 15 day-old corn tortillas, cut into 1-inch-wide strips
1 cup (2 ounces) shredded queso Chihuahua or other semisoft melting cheese (such
as Monterey Jack or Muenster)
1 cup grated queso añejo or other sharp grating cheese (such as pecorino romano or Asiago)
½ cup sour cream, preferably Mexican sour cream, called crema
1. Make the sauce: Heat a large sauté pan or skillet over medium heat. Add the oil and onion to the pan and cook, stirring, for about 3 minutes, or until softened. Add the garlic and cook for 1 minute, or until fragrant. Add the tomato puree, chile and adobo sauce, and salt, and bring to a gentle boil, stirring. Decrease the heat to low and cook,
uncovered, for 10 minutes, or until thickened. Set aside.
2. Preheat a stove-top pepper roaster or a grill pan over medium-high heat or preheat a broiler. Char the skin of the poblano, turning with tongs, for 10 to 15 minutes, until evenly blackened and blistered. Place the charred poblano in a bowl, cover with aluminum foil or plastic wrap, and let stand for about 20 minutes, or until cool enough to handle and the skin has loosened. Rub the charred skin off the cooled chile with your fingertips, or use the tip of a small knife. Rinse with water, then slit the chile along its length and open it flat. Cut out and discard the stem and scrape away the seeds and white membranes with the tip of a spoon. Cut the poblano lengthwise into ¼-inch-wide strips and set aside.
3. Line a tray with paper towels. Pour oil to a depth of ½ inch into a heavy 10-inch skillet, place over medium heat, and heat until a tortilla strip dropped into the oil sizzles on contact. Working in small batches, fry the tortilla strips for 20 to 30 seconds, until they begin to crisp but not brown. Use a slotted spoon or skimmer to transfer the tortilla strips to the prepared tray. Repeat until all the tortillas strips are fried.
4. Preheat the oven to 350°F. Spread one-third of the sauce in a 10-by-2-inch round or an 8½-by-10½-by-2-inch terra-cotta, ceramic, or enameled cast-iron baking dish. Layer half of the tortilla strips on top. Sprinkle with one third each queso Chihuahua and queso añejo cheese. Layer half of the poblano strips on top. Spread with half of the remaining tomato sauce and layer with all of the remaining tortillas strips, half of each cheese, and all of the remaining poblano strips. Add a final layer of tomato
sauce and then a layer of both cheeses. Spread the sour cream over the top.
5. Bake for 35 to 40 minutes, until the casserole is hot and bubbly. Let stand 10 minutes and serve.
Tuesday, August 11, 2009
Cookware: Braiser - From Things Cooks Love
 This multiuse round, shallow, two-handled stovetop-to-oven pan has a domed lid that keeps braised foods moist throughout cooking. Without the lid, it can be used in the oven as a baker or as a sauté pan. It is made from a variety of materials, some attractive enough to use for serving.
Braiser
The braiser, also known as the bistro or buffet casserole, is handsome enough to go directly from the oven or stove top to the table. It is relatively shallow (2 ½ to 3 inches deep) and has a large cooking surface, making it suitable for sautéing, browning, and braising compact foods such as chicken, fish, chops, and vegetables. The snug-fitting domed lid locks in the juices and allows the condensation to drip back onto the food, keeping it moist while it slowly cooks.
The pan, which has two looped opposing handles, is available in relatively lightweight, polished stainless steel–clad aluminum that heats up quickly and cleans easily. The other choice is a mattefinished enameled cast iron, which is a much heavier pan and heats more slowly but holds the heat longer, making it perfect for keeping foods warm on a buffet.
Tips for Using
Not just for braising, the pan—sans the lid—works as a baking dish and as a skillet on the stove top.
Because it is flameproof, the braiser can be used under the broiler.
Its broad, shallow profile means the brasier is good for cooking rice, and rice dishes like pilaf, perfectly. The braiser is handsome enough to use as a serving dish.
Braiser Recipe
Beef Braciole Stuffed with Sausage, Two Cheeses, and Dried Currants
Prep 45 min | Cook time 1 to 1½ hr | Serves 4
Braciole is a favorite Italian dish of meat slices pounded flat, spread with a filling, rolled into little bundles, and then slowly braised. For this recipe, you can use beef round, flank, or chuck, but pork cutlets, cut from the leg, will also work. As with so many slow-cooked dishes, the flavors improve if the recipe is made ahead and then reheated just before serving. Serve with mashed potatoes, polenta, or a small pasta shape, such as orzo. Serve with Creamy Polenta with Two Cheeses (page 57) or Fluffy Yukon Gold Potatoes with Goat Cheese and Green Onions
(page 111).
Implements
Meat Pounder, Cooking String or Silicone Ties, Braiser, Tongs, Flat-Edged Wooden Spoon or Flat Whisk, Food Mill, Cutting Board
Ingredients
Stuffing
8 ounces sweet Italian sausages, preferably with fennel, casings removed
1 large egg, lightly beaten
½ cup fine dried bread crumbs
½ cup (2 ounces) diced aged provolone cheese
½ cup grated pecorino romano or Asiago cheese
2 tablespoons chopped fresh Italian parsley
2 tablespoons dried currants or dark raisins
1 clove garlic, minced
8 thin slices (¼ to ¹⁄3 inch thick) boneless beef top round, flank, or chuck (about 1¼ pounds total)
Coarse salt and freshly ground black pepper
2 tablespoons extra-virgin olive oil, plus additional as needed
Sauce
½ cup finely chopped yellow onion
½ cup finely chopped carrot
1 clove garlic, minced
½ cup full-bodied red wine
1 (28-ounce) can Italian plum tomatoes with juices
1 bay leaf
1 tablespoon finely chopped fresh Italian parsley, for garnish
1. Make the stuffing: In a large bowl, combine the sausage meat, egg, bread crumbs, provolone cheese, pecorino romano cheese, parsley, currants, and garlic, and stir until well blended.
2. Lay a large piece of plastic wrap on a flat surface and place a slice of beef on top. Place a second piece of plastic wrap on top of the beef. Using a meat pounder, gently but firmly pound the meat, beginning in the center and working your way to the edges, until the meat is an even ¹⁄8 inch thick. Repeat with the remaining beef slices. Depending on the weight of the pounder and the thickness of the meat, each slice can take 10 to 20 firm, purposeful whacks to achieve the correct thickness.
3. Cut 16 pieces of cooking string each 10 inches long, or have ready silicone ties. Sprinkle each meat slice with a pinch of salt and a grinding of pepper.
4. Divide the stuffing into 8 equal portions (each one will be a heaping ¼ cup). Place a portion in the center of a meat slice and spread to within ½ inch of the edges. Press the stuffing evenly into the meat. Beginning with the narrow end, roll up the meat around the stuffing to make a neat bundle. Using the string or ties, tie each roll crosswise and lengthwise, like a package, securely but not too tightly. Repeat with the remaining meat slices and stuffing.
5. Heat the braiser over medium heat until hot enough for a drop of water to sizzle on contact, then add the olive oil. Arrange the meat rolls in the pan (they fit best if arranged like wheel spokes) and brown on all 4 sides, turning the rolls with tongs, for about 5 minutes total, or until evenly colored. Using the tongs, transfer the meat to a plate.
6. Make the sauce: If the pan is dry, add an additional drizzle of oil. Add the onion and carrot, and cook, over medium-low heat, stirring occasionally, for 5 minutes, or until softened. Add the garlic and cook for 1 minute, or until softened. Add the red wine and bring to a boil. Using the flat edge of a wooden spoon or a flat whisk, scrape the browned bits from the bottom of the pan. Boil the wine for 5 minutes, or until reduced by half. Remove from the heat.
7. Set a food mill fitted with the fine disk on the rim of a medium bowl, add the tomatoes with their juices, and puree. Or, puree the tomatoes in a food processor and then press though a fine-mesh strainer to remove the seeds.
8. Add the tomatoes and bay leaf to the braiser and bring to a boil. Return the beef rolls to the sauce, turning with the tongs to coat well, and reduce the heat to low. Cover and cook for 1 to 1 ½ hours, until the meat is tender when pierced with a fork. Turn the rolls occasionally and check to make sure the sauce isn’t boiling too hard.
9. Transfer the rolls to a cutting board and let rest for 5 minutes. Meanwhile, boil the sauce over high heat for 2 to 3 minutes, until slightly thickened.
10. Snip the strings from the beef rolls and discard, or untie the silicone ties. Cut the rolls on the diagonal into slices ½ inch thick, and arrange the slices on a warmed deep platter. Remove and discard the bay leaf from the sauce. Spoon the sauce on top of the rolls and sprinkle with the parsley. Serve hot.
Wednesday, July 15, 2009
Clam, Pork, Sausage, and Bacon Stew
 From Things Cooks Love, by Sur La Table and Marie Simmons
Prep 30 min | cook time 50 min | serves 4
A number of traditional Portuguese dishes are based on the unlikely, but flavorful, combination of pork and shellfish. This variation on amêijoas na cataplana, the classic clam and pork stew, calls for three types of pork: fresh pork cubes, spicy sausage, and bacon. The addition of Italian green beans, also known as romano beans, with the clams makes this recipe a one-pot meal. Serve with plenty of bread to sop up the flavorful sauce.
Implements:
Food Mill, Rubber Spatula, Large, Heavy Skillet, Cataplana, Oven Mitts
Ingredients:
1 can (28-ounce) Italian plum tomatoes with juices
2 tablespoons extra virgin olive oil
2 (1/4-inch-thick) slices bacon, cut into ¼-inch dice
1 cup chopped yellow onion
1 cup chopped red bell pepper
1/2 cup chopped green bell pepper
3 cloves garlic, coarsely chopped
4 ounces chouriço or chorizo, casings removed and cut into ¼-inch dice
4 ounces pork tenderloin, loin, or shoulder, cut into ¼-inch dice (optional)
2 teaspoons sweet paprika
1/2 cup dry white wine
2 tablespoons finely chopped fresh Italian parsley
2 pounds littleneck or Manila clams, cleaned (see Tip, page 222)
8 ounces romano or other green beans, trimmed and cut into 1-inch lengths
- Fit a food mill with the medium disk, and set the mill on the rim of a medium bowl. Put the tomatoes with their juices in the food mill and puree. Reverse the crank to extract every bit of flavor from the tomato pulp, and occasionally stop to clean the underside of the mill with a rubber spatula, so the puree falls freely. Discard the pulp left in the strainer. Set the puree aside.
- In a large, heavy skillet, heat the olive oil over medium heat until hot enough to sizzle a piece of bacon. Add the bacon and cook, stirring, for 5 minutes, or until lightly browned. Add the onion and red and green peppers and sauté, stirring, for 8 minutes, or until the vegetables are wilted and beginning to turn golden. Add the garlic and sauté for 1 minute. Stir in the chouriço and pork and cook, stirring, for 3 minutes, or until lightly browned. Sprinkle with the paprika and cook, stirring, for 1 minute.
- Add the wine, tomatoes, and parsley and bring to a boil. Decrease the heat to low and cook, uncovered, for 20 minutes, or until liquid is slightly reduced.
- Spoon half of the sauce into the cataplana; spoon the clams on top and scatter the green beans over the clams. Spoon the remaining sauce on top. Secure the cover in place.
- Place the cataplana over medium heat and cook for 10 minutes, or until the clams have opened. Bring the cataplana to the table and, using oven mitts, carefully remove the cover. Discard any clams that failed to open. Spoon the clams and rich sauce into warmed shallow bowls and serve at once.
tip
Preparation in Alternative Cookware
Cook the sauce in a Dutch oven or braiser instead of the skillet. Add the clams, cover, and cook as directed for the cataplana.
Tuesday, June 30, 2009
Potato, Onion, and Gruyère Galette
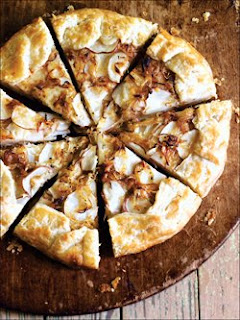 From The Art and Soul of Baking, by Sur La Table and Cindy Mushet
Serves 8 to 10
Here is a savory version of the free-form fruit tart known in France as a galette. If Gruyère is unavailable, substitute Italian fontina or any good melting cheese. Be sure to use red or fingerling potatoes, as they hold their shape much better than baking potatoes, like russet, whose interiors turn to mush when cooked. Though rustic and casual, it is an instant party food when dressed up with crème fraîche and golden caviar.
Ingredients
1 recipe Flaky Pie or Tart Dough (page 157)
Filling
1 large onion (12 ounces), thinly sliced
1 1/2 tablespoons olive oil
1/4 teaspoon kosher salt
5 grinds black pepper
1/2 teaspoon finely chopped fresh thyme or rosemary
4 ounces Gruyère cheese, grated
1 pound red potatoes
To Finish
1 tablespoon olive oil
Pinch kosher salt
3 grinds black pepper
1 egg
For Serving (optional)
Crème fraiche
Golden caviar
Equipment
Chef’s Knife, Sauté Pan, Small Bowl, Pastry Brush, Paring Knife or Skewer, Metal Spatula, Cake Lifter or Two Spatulas or the Bottom of a Tart Pan
1 Advance Preparation: Roll the prepared dough into a 13-inch round, transfer to a parchment- or silicone-lined baking sheet, and chill for 1 hour. Preheat oven to 400°F and position an oven rack in the lower third.
2 Make the filling: Heat the sauté pan over a medium-high flame. Add the olive oil and when it is hot, add the onion slices to the pan. Cook, stirring occasionally, until the onion is soft and lightly colored, 8 to 10 minutes. Stir in the salt, pepper, and chopped thyme or rosemary and blend well. Scrape onto a plate and set aside to cool. Wash the potatoes and pat dry, but don’t peel them. Cut into 1/4-inch-thick slices.
3 Assemble the galette: Mix together the cooled onion mixture, grated cheese, and potato slices. Spread the mixture over the prepared pie dough, leaving a 1 1/2-inch border around the edges. Drizzle with the remaining olive oil and sprinkle lightly with salt and pepper. Fold just the border of the dough up around the filling, pleating it to make a pretty, circular enclosure, leaving the center open. In a small bowl, beat the egg with a fork. Lightly brush the pleated dough with the egg to give it shine and help it brown in the oven.
4 Bake the galette for 45 to 50 minutes, or until the pastry is golden brown and the potatoes are soft when tested with a paring knife or skewer. Check the bottom of the galette for doneness by lifting slightly with a metal spatula. Transfer to a rack to cool for 5 to 10 minutes.
5 Transfer the galette to a serving plate with a cake lifter or two spatulas, or the bottom of a tart pan slipped underneath to keep it from breaking as you move it. Slice and serve warm.
Monday, December 1, 2008
Classic Lemon Bars
 From The Art and Soul of Baking
Makes 36 (1½-inch) squares
Eyes light up at the sight of these tart and refreshing favorites. A soft, puckery lemon filling atop a vanilla scented shortcrust is just the ticket after a rich winter meal, and it is also a refreshing treat on a hot summer day. Okay, okay, it’s great anytime. Surprisingly easy to make, these bars deliver a lot of satisfaction for the amount of elbow grease invested. Of course lemon is the classic, but you could substitute lime juice as well. Or, for a more exotic version, try an equal amount of passion fruit juice instead of the lemon juice.
Ingredients
1 recipe Vanilla Shortcrust Dough (page 209 - see below), prepared through Step 2
4 large eggs
2 cups (14 ounces) granulated sugar
5 tablespoons (1¾ ounces) unbleached all-purpose flour
²⁄³ cup (5 ²⁄³ ounces) strained freshly squeezed lemon juice
Confectioners’ sugar, for dusting (optional)
Equipment
9-inch Square Cake Pan, Silicone or Rubber Spatula, Cooling Rack, Whisk, Medium Bowl, Thin Knife or Small Spatula, Fine-Mesh Strainer
1 Preheat the oven to 350°F and position an oven rack in the center.
2 Line the pan with foil across the bottom and up all four sides, then lightly coat with melted butter, oil, or high-heat canola-oil spray. With the spatula, scrape the dough into the prepared pan and press it into an even layer across the bottom of the pan. Chill for 30 minutes.
3 Bake the chilled crust for 35 to 45 minutes, until golden brown. Transfer to a rack and allow to cool for 20 minutes. Reduce the oven temperature to 300°F.
4 Whisk the eggs and granulated sugar together in the medium bowl. Whisk in the flour until there are no lumps. Whisk in the lemon juice. Pour the filling over the crust. Bake for 50 to 60 minutes, until the filling is set and does not jiggle when you tap the side of the pan. Transfer to a rack to cool completely. When cool, refrigerate for 1 hour.
5 To serve, grasp the foil and lift the cookies out of the pan. Set them on a cutting surface. Gently peel back the foil, using the tip of a thin knife or small spatula to help separate the bars from the foil if necessary. Cut into 1½-inch squares and transfer to a serving plate or storage container. Just before serving, use a fine-mesh strainer to dust confectioners’ sugar over the tops. (Wait until the last minute to do this or the confectioners’ sugar will soak into the filling and look blotchy.)
Storing
The bars keep well at room temperature for 1 day. For longer storage, keep them airtight in the refrigerator for up to 3 days. The bars cannot be frozen, however, because the crust becomes soggy when defrosted.
Vanilla Shortcrust Dough
Makes 1 (9- or 9½-inch) tart shell
The wonderfully crisp and crumbly texture of this easy-to-use tart dough resembles a vanilla shortbread cookie, suitable to many types of fillings. There are different ways to make a shortcrust shell. This recipe offers two options for mixing the dough, with a food processor or by hand. There are also two options for forming the shell, by rolling out the dough or pressing it directly in the pan.
Ingredients
1 ¼ cups (6 ¼ ounces) unbleached all-purpose flour
¼ cup (1 ¾ ounces) sugar
¼ teaspoon salt
1 stick (4 ounces) cold unsalted butter, cut into ½-inch pieces
2 large egg yolks
2 teaspoons pure vanilla extract
1 to 3 teaspoons water
Equipment
Food Processor Fitted with a Metal Blade or a Medium Bowl and Pastry Blender, Small Bowl, Whisk, Rolling Pin (Optional), 9- or 9 ½-inch Fluted Tart Pan with Removable Bottom
1 To mix the dough using a food processor: Place the flour, sugar, and salt in the bowl of a food processor. Pulse 5 times to blend. Add the cold butter pieces and pulse 6 to 8 times, just until the butter is the size of large peas. In the small bowl, whisk together the egg yolks, vanilla, and 1 teaspoon water. Add to the butter mixture, then process just until the dough begins to form small clumps, 5 to 10 seconds. Do not let the dough form a ball. Test the dough by squeezing a handful of clumps—when you open your hand, they should hold together. If they are crumbly and fall apart, sprinkle 1 teaspoon water over the dough and pulse several times, then test again. Repeat, if necessary. To mix the dough by hand: Place the flour, sugar, and salt in the medium bowl and blend well with the whisk. Add the cold butter pieces and toss until they are lightly coated with the flour. Use the pastry blender or your fingertips to cut the butter into the flour until the mixture resembles bread crumbs or crushed crackers. If at any time during this process the butter softens and becomes warm, place the bowl in the freezer for 10 minutes before continuing. In the small bowl, whisk together the egg yolks, vanilla, and 1 teaspoon water. Add to the dry ingredients and toss between your fingertips or with a fork 20 to 30 times to evenly distribute the moisture. The dough will still look very crumbly, but if the mixture is squeezed in your hand, it should hold together. If not, sprinkle another teaspoon of water over the top and toss to blend. Repeat, if necessary.
2 Finish the dough: Turn the dough out on a lightly floured work surface and knead gently 2 or 3 times, just to finish bringing it together. Shape it into a disk about 6 inches in diameter. If the dough is still cool to the touch, continue on to the next step. If the dough is soft and sticky, wrap it in plastic and refrigerate for 30 minutes before continuing.
3 To make the tart shell by rolling the dough: Make sure the dough is cool but malleable. If it has been refrigerated or frozen and is quite hard, let it sit on the counter for 10 to 12 minutes before rolling; otherwise, the dough will crack under the pressure of the rolling pin. Since it’s difficult to remove this dough from the work surface without tearing it unmercifully, place the dough disk between two 14-inch pieces of waxed paper, parchment paper, or plastic wrap. Roll it into an 11-inch round, rotating it (and the paper) clockwise slightly after each roll to create an even round. Remember to roll from the center outward and to lift the rolling pin at the edge to avoid smashing the edge into the paper, which will make removing the paper difficult. As you roll, the paper or plastic wrap will get wrinkled into the dough. When this happens, peel it off, smooth out the wrinkles and lay it back on the dough. Flip the dough over and repeat, if necessary, with the top piece. Continue to roll, flipping and smoothing wrinkles as necessary, until the dough is 11 inches across and between ¹⁄8 and ¼ inch thick. If the dough is soft and sticky, transfer it to a baking sheet and chill it for 30 minutes. Peel off the top piece of paper or plastic. Leave the bottom piece attached—this will hold the dough together while you transfer it to the pan. Lift the dough by the exposed paper or plastic and flip it over and center it over the tart pan as best you can. Peel off the paper or plastic. (If it sticks and won’t come off, place everything on a baking sheet and chill for 30 minutes—the paper will then peel off easily.) Ease the dough across the bottom of the pan and up the sides, pressing it into the corners of the pan with your fingertips. If the dough breaks or cracks, just press it together again. Once the dough is even in the pan, fold the excess dough at the edge inward to create a double layer of dough along the wall. Press firmly with your thumbs to fuse the two layers of dough, then roll your thumb over the rim of the pan to remove any excess dough there. Save the excess dough in case a crack forms in the crust during baking. Refrigerate for 1 hour or freeze for 30 minutes before baking. To make the tart shell by pressing the dough into the pan by hand: First, chill the dough for 30 minutes. Break the cold dough into small pieces roughly an inch or two in diameter and scatter them evenly over the bottom of the tart pan. Use the heel of your hand to press the pieces of dough flat, connecting them into a smooth, even layer. Press from the center of the pan outward, building up some extra dough where the bottom meets the side. Using your thumbs, press this excess up the sides of the pan to form the walls, making sure they are the same thickness as the dough on the bottom of the pan. Roll your thumb over the rim of the pan to remove any excess dough (save this for patching any cracks that might form during baking). Refrigerate for 1 hour, or freeze for 30 minutes before baking.
What The Pros Know
Professionals have to keep one step ahead, and you can follow their lead. Both this shortcrust dough and Easy Chocolate Press-In Dough (page 212) may be refrigerated, wrapped in plastic, for up to 3 days, and they also freeze beautifully for up to 6 weeks. So, when preparing tart dough, think about doubling or tripling the recipe and refrigerating or freezing the extra batches.
To freeze made-ahead doughs, flatten each batch of dough into a 6- or 7-inch disk, double-wrap in plastic, and slip into a resealable plastic freezer bag. Thaw overnight in the refrigerator or on the counter for 1 hour before using. To make life even easier, roll or press the dough into the tart pan(s) immediately, then wrap the entire pan in plastic wrap and freeze in a resealable plastic bag. Be sure to include a nub of dough left over from trimming, to patch any cracks that form during baking. Then, when you want a tart, all you need to do is unwrap and pop it the preheated oven, allowing 3 to 5 extra minutes for baking.
Monday, October 27, 2008
Classic Fudgy Brownies
 From The Art and Soul of Baking
Makes 16 (2-inch) brownies
Rich, dark, fudgy, and slightly chewy, these homemade brownies are always a hit, so much better than anything you can buy. Serve cold with a glass of milk, or warm from the oven with a scoop of ice cream. Like a simple black dress, they can be accessorized to match any occasion. For a casual snack, serve them right out of the pan. For something a bit dressier, dust the brownies with a layer of confectioners’ sugar, then use a stencil and cocoa powder for a contrasting design (see page 436).
Inspired by Jackson Pollock? Drizzle melted dark chocolate (or dark, milk, and/or white chocolates) wildly over the top. For a very special occasion, paint a message or design right onto the brownies using gold luster dust (see page 436) or frost them with a layer of Dark Chocolate Ganache (page 412) accented with the elegance of gold leaf (page 436).
Ingredients
1 stick (4 ounces) unsalted butter, cut into ½-inch pieces
4 ounces semisweet or bittersweet chocolate (up to 64 percent cacao), finely chopped
2 ounces unsweetened chocolate, finely chopped
1 cup (7 ounces) sugar
2 large eggs, at room temperature
1 ½ teaspoons pure vanilla extract
½ cup (2 ½ ounces) unbleached all-purpose flour
Pinch of salt
½ cup (about 3¾ ounces) chocolate chips or chunks (optional)
½ cup (2 ounces) chopped nuts, toasted and cooled completely (optional)
Equipment
8-inch Square Cake Pan, Parchment Paper, Double Boiler, Silicone or Rubber Spatula, Whisk, Cooling Rack, Thin Knife or Flexible Spatula, Chef’s Knife
1 Preheat the oven to 350°F and position an oven rack in the center. Line the pan with foil or parchment paper across the bottom and up two of the sides, then lightly coat with unflavored oil or high-heat canola-oil spray.
2 Bring 2 inches of water to a boil in the bottom of a double boiler. Place the butter, semisweet chocolate, and unsweetened chocolate in the top of the double boiler (off the heat). Turn off the heat, then set the butter and chocolate over the steaming water. Stir occasionally with the spatula until the chocolate is melted and the mixture is smooth.
3 Remove the chocolate mixture from the heat and whisk in the sugar. Whisk in the eggs, one at a time, stirring well to incorporate each before adding the next. Stir in the vanilla extract. Whisk in the flour and salt. Continue to stir until the mixture changes from dull and broken-looking to smooth and shiny, about 1 minute. Whisk in the chocolate chips and chopped nuts, if using.
4 Scrape the batter into the prepared pan and spread evenly. Bake for 35 to 40 minutes, until a skewer inserted into the center of the brownies comes out with a few moist crumbs clinging to it (do not overbake). Transfer to a rack and cool completely
5 Run a thin knife or flexible spatula around the edges of the pan to loosen the brownies. To remove the brownies from the pan, grasp the foil or parchment paper extending up the sides and pull gently upward. Set the brownies on a cutting surface and use a chef’s knife to cut into 16 equal pieces. Since these are fudgy, it’s a good idea to keep a hot, wrung-out towel nearby so you can wipe the knife clean between slices. You could also serve the brownies right out of the pan, if you like, pressing a piece of plastic wrap against any cut surfaces and across the top to keep them fresh.
Storing
Tightly wrap the remaining brownies in plastic or place in an airtight container. They will keep well at room temperature for 2 to 3 days, or in the refrigerator for up to 5 days.
Chocolate Mint Brownies with White Chocolate
Chunks Omit the vanilla extract and add ¾ teaspoon pure mint extract instead. Do not use nuts or dark chocolate chips at the end of Step 3, but instead add 4 ounces of good quality white chocolate chopped into ¼-inch pieces. Bake and cool as directed above. Melt an additional 1 ½ ounces of white chocolate and pipe or stripe it over the top of the cooled brownies in any pattern you like (page 431). Let the white chocolate cool and harden before cutting the brownies.
Chocolate-Pecan Brownie Cookies
Use toasted pecans for the nuts and substitute mini chocolate chips for the larger chips or chunks. Use a spoon or small ice cream scoop to portion tablespoons of batter about 1 inch apart on parchment-lined baking sheets. Bake at 350°F for 8 to 10 minutes, rotating the sheet halfway through. The cookies won’t seem done, but will firm up as they cool. The tops should look matte instead of shiny—you may want to bake a few to get the timing right before you commit to the entire batch. Makes about 45 cookies.
What the Pros Know
There are two types of brownies—fudgy and cakey. Fudgy brownies always begin with butter and chocolate melted together, which creates a dense, chewy texture. Cakey brownies begin with butter and sugar creamed together, and the chocolate is added later. The creaming step fills the batter with air, lightening it and making it more cake like in texture. You can change the style of your brownies by simply changing the mixing method to achieve the texture you want.